All posts by admin

Error 20003. Could not configure vCenter Single Sign-On

You may receive this error when installing vCenter Single Sign-On. You may see something similar to this in %TEMP%\vminst.log:

VMware Single Sign On-build-941610: 01/16/13 15:00:01 RunSSOCommand:: error code returned is 255 while launching C:\Program Files\VMware\Infrastructure\SSOServer\utils\rsautil.cmd
VMware Single Sign On-build-941610: 01/16/13 15:00:01 Posting error message 20003

The solution in my case was to browse to the directory where VMware was installed (default C:\Program Files\VMware\Infrastructure) and rename the JRE folder to something else. Make sure you have vCenter services stopped before attempting to rename the JRE folder. Once that’s done, install SSO. Do not worry about renaming the folder because your next step should be to install the Inventory Service and then vCenter which will replace the JRE folder.
Print Spooler (spoolsv.exe) crashes repeatedly – find corrupt/unsupported drivers

If you find that your print spooler service continuously crashes or won’t even start at all, it could be due to an unsupported or corrupted printer driver. To help determine what the cause of the issue is, you will need to do the following.

  1. Download Windows Debugging Tools SDK from this location and install them to a location you’ll remember.
  2. Create a folder on your C: drive named debug.
  3. Open a command prompt change directory to the folder where you installed the debugging tools.
  4. Change directory again to “Debuggers\x86.” (Note: This location may change depending on operating system. You are looking for the file location of adplus.exe.)
  5. Run the following command: adplus -crash -pmn “spoolsv.exe” -o C:\debug.
  6. Start the Print Spooler service.

The adplus command will wait for the print spooler service to start then attach itself to it for debugging purposes. When the service crashes, it will create a folder inside of C:\debug with a date/timestamp similar to this: 20120807_095027_Crash_Mode. Inside of that folder will be a couple of log files. Examine the log files and search for verify. In my case, it found the following line: *** WARNING: Unable to verify checksum for C:\Windows\System32\XRZWSLAI.DLL. Next, we need to delete the printer and drivers from the registry.

To delete the printer and drivers from the registry, do the following:

  1. Open the registry editor.
  2. Browse to: HKEY_LOCAL_MACHINE\SYSTEM\CurrentControlSet\Control\Print\Environments\Windows NT x86\Drivers\ (Note: If you’re running the 64-bit version of Windows, the registry location will most likely be Windows x64 rather than Windows NT x86.)
  3. There will be a subkey Version-2 or Version-3 depending on your operating system.
  4. Export the registry key before deletion to ensure you have a backup.
  5. Delete the appropriate key that relates to the corrupt/unsupported driver.
  6. Browse to: HKEY_LOCAL_MACHINE\SYSTEM\CurrentControlSet\Control\Print\Printers.
  7. Export the registry key before deletion to ensure you have a backup.
  8. Delete the appropriate key that relates to the printer.
  9. Start the Print Spooler service.

Disable SSLv2 on IIS 6 for Windows 2003

SSLv2 should be disabled on any machine running IIS as a security precaution. To do this, open a command prompt on the target server and run the following commands to add values to the registry to disable it.

REG ADD “HKLM\System\CurrentControlSet\Control\SecurityProviders\SChannel\Protocols\PCT 1.0\Server” /v Enabled /t REG_DWORD /d 0 /f

REG ADD “HKLM\System\CurrentControlSet\Control\SecurityProviders\SChannel\Protocols\SSL 2.0\Server” /v Enabled /t REG_DWORD /d 0 /f

Cisco Catalyst Switch Unsupported SFP err-disabled Port

If you have a third party or unsupported SFP installed in your switch the switchport will go to err-disabled state. By running the command show interface status err-disabled you will see the reason is Unsupported SFP.

Obviously the recommended thing to do is purchase a valid, supported SFP that Cisco recommends so if you have any issues you can call them for support. If you don’t have one handy or the time, do the following.

Run the following command:

service unsupported-transceiver

Do not try to tab-complete the command as it is a hidden IOS command. Type it in, hit enter, then you will see the following warning:

Warning: When Cisco determines that a fault or defect can be traced to
the use of third-party transceivers installed by a customer or reseller,
then, at Cisco’s discretion, Cisco may withhold support under warranty or
a Cisco support program. In the course of providing support for a Cisco
networking product Cisco may require that the end user install Cisco
transceivers if Cisco determines that removing third-party parts will
assist Cisco in diagnosing the cause of a support issue.

Furthermore, enter this command as well to disable the switch from putting the port into err-disabled state in the future:

no errdisable detect cause gbic-invalid

Setup DHCP Reservation on Cisco Router/Switch

If you want to configure a DHCP reservation on a switch or router, gather the MAC address of the device. If you are unsure of the MAC address of the device, you can find the current IP address and issue the following commands to get the MAC address and clear the DHCP binding before you create the pool.

show ip dhcp binding | include 10.11.12.4
clear ip dhcp binding 10.11.12.4

Next, run the following commands to setup the reservation. Obviously change the pool name and the IP addresses referenced to match your environment. You may notice that the client-identifier below is 14 digits rather than 12 like a standard MAC address. You have to append 01 in front of the MAC address.

ip dhcp pool My_Reservation
host 10.11.12.4 255.255.254.0
client-identifier 01f0.cba1.6916.96
default-router 10.11.12.1
dns-server 10.11.1.10
domain-name yourdomain.local

NPS Certificate Setup for PEAP/EAP-MSCHAPv2 Wireless Authentication on Windows Server 2008

So if you find yourself wanting to use PEAP 802.1x authentication, you will need to make sure there is a certificate bound to the PEAP authentication method on the network policy. In order to get the right type of certificate, you should follow the steps below. Note: In my case, I was unable to add a regular “Computer” enrollment so I had to follow the steps below to get it working. If you find yourself able to enroll a “Computer” certificate at step 9 below, you can ignore steps 1-8.

  1. In the Certificate Templates Console, under Template Display Name, find Computer. Right-click it, click Duplicate Template, and then click OK.
  2. In Properties of New Template, on the General tab, under Template display name, type a name for your new template. You can use something like Wireless Authentication. While you are on the General tab, you can also set a validity period. By default it will be 1 year. Do not select more than 2 years or some additional tweaking will be required (steps not listed here).
  3. Click the Security tab. Here is where you need to add permission for you to enroll. Click Authenticated Users and check the box next to Allow for Enroll. Click OK and now you’ll see the new certificate template at the bottom of the list.
  4. Close the Certificate Templates console. Click Start, Run, certsrv.msc, enter. This will open the local Certification Authority console.
  5. Right-click the Certificate Templates folder, point to New, then click Certificate Template to Issue. Scroll down the list and find the new template you created. The name I suggested was Wireless Server Auth but you might have picked something else. Highlight this template and then click OK. Now you should see that it is added to the list of Certificate Templates.
  6. While you are in this console, click on the Issued Certificates container. You should see a list here of all the certificates that this CA has issued. You can also view Pending Requests (for certificates that require approval before being issued) and Failed Requests (there was a problem issuing the cert).
  7. Go back to the local computer certificate console (Start, Run, mmc, enter, File… Add/Remove Snap-in, Certificates, Add, Computer account, Next, Local computer Finish, OK). Right-click the container under Personal\Certificates, point to All Tasks, Request New Certificate, Next, Next. You should now see the Wireless Authentication certificate. Choose it and click Enroll. At this point you should now see another certificate in the list. You can tell which one is the one you just issued by looking at the details tab and viewing Certificate Template Information.
  8. Go back to PEAP properties in the Network Policy and choose the newly created certificate.

Exchange 2007/2010 Internal Relay Receive Connector Does Not Relay

So you’re working with Exchange 2007/2010 and you’ve got the need to allow some internal applications, PCs, or servers to relay mail through the Exchange server, but it doesn’t seem to be working even though you’ve got the receive connector created with the right properties:

  1. Connector type: Custom
  2. Authentication: TLS, Externally Secured
  3. Permission Groups: Anonymous
  4. Network: IP addresses listed of the servers/PCs you want to be able to relay from

You need to do one last step to allow anonymous logon/relay, but it needs to be done with the Exchange Management Shell (EMS).

Let’s say your connector is named Internal Relay. Run the following command in EMS: Get-ReceiveConnector “Internal Relay” | Add-ADPermission -User “NT AUTHORITY\ANONYMOUS LOGON” -ExtendedRights “Ms-Exch-SMTP-Accept-Any-Recipient”

That should do it. Test relay and you should see that it is successful.

Installing 32-bit Printer Drivers on Windows 2008 R2 Asks for ntprint.inf

You may find that attempts to add certain 32-bit printer drivers to a Windows 2008 R2 print server prompt you for the location of ntprint.inf. This is a huge pain, but it can be solved by doing the following:

  1. Locate a Windows Vista or Windows 7 32-bit computer on your network and document it’s computer name.
  2. Click Browse on the prompt for ntprint.inf and type in the location to the Windows 7 machine: \\computer-name\c$\windows\winsxs\
  3. Scroll down through the window and locate x86_ntprint.inf_xxxxx then click it to open it. xxxxx is a random hex string and version number.
  4. Click ntprint.inf and click OK to select it and then OK once more to accept the path and finish the driver installation.

Unable to connect to the MKS: The remote host certificate has these problems

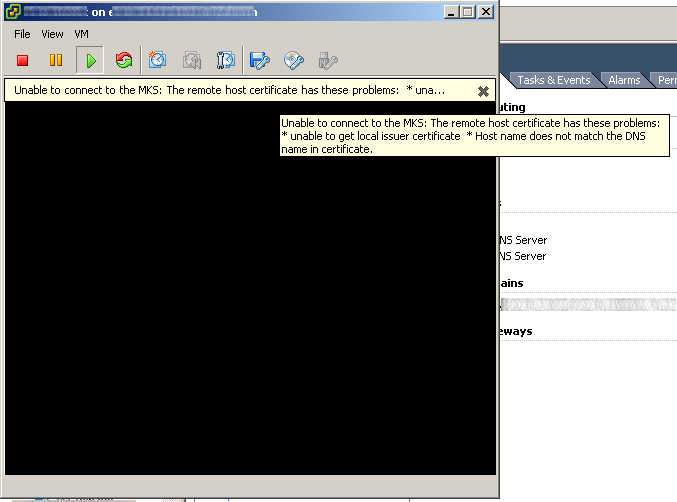
I ran into this error when upgrading our hosts to ESXi 5.0 from 4.1u1. I used the option to format and re-install ESXi. Once the upgrade was complete, the host re-connected to vCenter successfully and all VM operations acted normal except for being able to launch the console of a VM.

MKS Error

Unable to connect to the MKS: The remote host certificate has these problems: *unable to get local issuer certificate * Host name does not match the DNS name in certificate.

The problem was the certificate chain and DNS name stored in the vCenter database was referencing the old ESXi installation rather than the new one. To solve the problem, I removed the hosts from the vCenter inventory and rejoined them to vCenter.

Autologon Domain-Joined Windows 2008 R2 Server

When a workstation/server is joined to a domain, it hides the checkbox for “Users must enter a user name and password to use this computer” from the userpasswords2 control panel.

To get autologon working, you need to restore this functionality by running the following from a command prompt to add a registry key:

reg add “HKLM\SOFTWARE\Microsoft\Windows NT\CurrentVersion\Winlogon” /v AutoAdminLogon /t REG_SZ /d “1” /f

Once that is done, it is recommended to run the following from a command prompt to add a registry key to specify the default logon domain:

reg add “HKLM\SOFTWARE\Microsoft\Windows NT\CurrentVersion\Winlogon” /v DefaultDomainName /t REG_SZ /d “domain” /f

After both registry keys have been added, launch the userpasswords2 (Start->Run->control userpasswords2) and click “OK.” to set the username/password you want to autologon with.

Please note: This tip also works for Windows 7 and Windows Server 2008.